Submit Blog Sitemap to Google via Google Webmaster Tools

Google controls 85% of the global search and any blog is heavily dependent on traffic from search result. We must make sure that all the posts or pages of our blog are indexed by Google. We can submit a blog sitemap to Google through Google Webmaster Tools. Google can then use this sitemap to quickly index all the entries of a blog.

webmaster-tool

Where is the Sitemap of My Blogger/Blogspot Blog?


In very simple words, a sitemap is a large single web page containing all of your posts and labels. Blogger/Blogspot users can submit their feed as a sitemap to Google. All Blogger/Blogspot blogs have a feed address of this form:

http://www.bloggerfaqs.blogspot.com/feeds/posts/default

The above feed can display only last 25 blog posts. Most blogs have more than 25 posts so we must make sure that all the posts should get indexed. To do that, we can change the above code to:

http://www.bloggerfaqs.blogspot.com/feeds/posts/default?max-results=500

Now, last 500 posts will be shown in the feed. Now, we have a sitemap & we're ready to submit it to Google through Google Webmaster Tools.

Open Google Webmaster Tools


Google Webmaster Tools provides you with detailed reports about your pages' visibility on Google. To get started, simply add and verify your site and you'll start to see information right away.

1- Go to the following address and sign in with your Google account:

http://www.google.com/webmasters/

2- Click on Add a Site button to add your blog.

3- A small box will appear, enter your blog URL in it.

4- Now you need to prove that you are the owner of this blog, for this you need to verify.

5- Chose Meta Tag as verification method and copy the tag which looks something like this:

<meta name="verify-v1" content="z6MLWEMxLvMFcoVNvGPKOMvAn1oJBKem+eTEpZ1F/DU=">

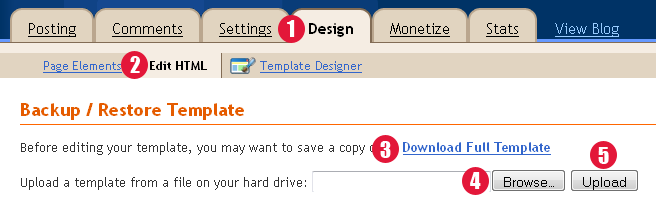
6- Now come back to your Blogger account and go to Design -> Edit HTML section.

7- Paste the Meta Tag right after <head> tag, the <head> tag is in the start of your code just after a few lines.

8- Once you've pasted the code, click on Save Template button to save your changes.

9- Now again go to you Webmaster Tools account and click on verify button to complete verification process.

10- If you've done everything right, you'll see that you're site is verified now.

Warning: Don't remove the Meta Tag after verification process, it might be checked again.

11- Now, you'll see a list of verified sites (I suppose you'll see only 1 site there) on your Google Webmaster Tools homepage.

12- Click on your site and you'll see a dashboard page of that site.

13- From the menu on the left side, expand the Site configuration option and then click Sitemaps.

14- On the next page, click Submit a Sitemap button and it will ask you to enter the sitemap of your blog. The address of your blog will be already there so you just have to add the remaining part which is:

feeds/posts/default?max-results=500

Overall the code would look something like this:

http://www.bloggerfaqs.blogspot.com/feeds/posts/default?max-results=500

So just submit the sitemap there and Google will take some time (Typically, less than 24 hours) to index the contents of your sitemap.

Final Thoughts


Many readers complain that there blog doesn't appear in search results even after getting indexed. Please note that getting indexed doesn't guarantee that you're blog will also appear in search results for a specific keyword. Just use natural post and blog titles, publish new posts regularly and engage with readers to get decent traffic from Google.

How to Backup or Download a Blogger Blogspot Template

It is very important that you regularly backup your template layout. You can easily download your exiting layout and restore it if anything goes wrong during experiment or when applying a tutorial.

Blogspot How To: Change Post Title Color in Blogger Template Designer Templates


Steps to Backup your Blogger/Blogspot Template


Step 1. Go to Design -> Edit HTML tab.


Step 2. Click on Download Full Template link.

Blogspot How to: Backup/Restore Your Blogger/Blogspot Template

Step 3. Save the .XML template file on your hard drive.

Tip: Whenever I download my template file, I rename it to the current date which makes it easy to find.

Tip: Whenever you work in Edit HTML section, make sure you always first download your template for backup.

Steps to Restore Your Blogger/Blogspot Template


Step 1. Go to Design -> Edit HTML tab.


Step 2. Click the browse button, select the backup template from your hard drive and upload it.

Blogspot How to: Backup/Restore Your Blogger/Blogspot Template

How to Backup & Restore Blog Posts Using Blogger Import/Export Feature


Blogger has an awesome feature to download and save blog posts on your computer. Of course, you can later restore the posts as well. Additionally, you can also move your posts to some other blogging platform using the export feature or to some other Blogger blog. I'd highly recommend to regularly backup your posts. Check out the instructions to see how to do it.

1- Export or Backup Blog Posts to Your Computer


  1. Chose Settings from the list of options. You can press the drop down arrow button to see more options.
  2. In the Settings section, click Other from the left menu.
  3. You'll see 3 options in Blog Tools. Click Export blog. A window will open where you'd have to click the Download Blog button.
  4. An .XML file will be downloaded to your computer. Make sure to give it a proper name and keep it safe. This file will be used to restore your posts later.

2- Import or Restore Blog Posts From Your Computer


  1. Chose Settings from the list of options. You can press the drop down arrow button to see more options.
  2. In the Settings section, click Other from the left menu.
  3. You'll see 3 options in Blog Tools. Click Import blog. A window will open where you'd have to browse the file on your computer & click the Import Blog button.
  4. If you're importing posts from some other blog then make sure that Automatically publish all imported posts is not checked.
  5. Now your posts have been imported or restored.

How to Enable Official Share Buttons in Blogspot/Blogger Templates


Blogger has officially announced sharing buttons. These buttons let your readers share posts on social networks like Twitter, Facebook & Google Plus. These sites bring traffic and are important for search engine rankings. The great thing is that the share buttons automatically shortens post URL/address because Twitter allows only 160 characters per tweet. In this post, I'll explain how you can enable official share buttons.

First, Enable the Share Buttons!


Enabling share buttons under Blogger posts is very easy. Just go to Layout. Edit the Blog Posts gadget and enable Show Share Buttons option. Click the following image to see full size:


What to Do If Share Buttons Do Not Appear?


If you're using an old template then there is a chance that share buttons won't show up even if you've enabled them. So follow these steps:
  1. Open the Template section.
  2. Blogger Updated Dashboard
  3. Click the Edit HTML button.
  4. Blogger Edit HTML Button
  5. A new window will open. Click the Proceed button to start editing.
  6. Blogger Proceed Button
  7. Check Expand Widget Templates option. The page will automatically refresh.
  8. find this code:
        <data:post.body/>
    and REPLACE it with the following code:
        <data:post.body/>
    <div class='post-share-buttons'>
    <b:include data='post' name='shareButtons'/>
    </div>
  9. That's it. Click Preview button and you will see share buttons right under the post body. After that, save your template.

Important: After saving the template. Make sure that the buttons are enabled in Blog Posts widget as described in the previous section of this tutorial.

How to Show Share Buttons Only on Post Pages?


By default, share buttons will appear on all pages. It might look a little messy and some people might want share buttons to appear only on post pages. To do that, you need to add a simple if-else condition. Instead of the above code, add this code after <data:post.body/>:
<b:if cond='data:blog.pageType == &quot;item&quot;'>
<div class='post-share-buttons'>
   <b:include data='post' name='shareButtons'/>
</div>
</b:if>

If you've any problem, feel free to leave me a comment.

Update! Share Buttons are Grey


Many of you guys are complaining that the share buttons are appearing in Grey color. Well, don't worry about that because that's how they should appear. I don't know any method (yet) to make them colored. By default, they are Grey and will only become colorful when you'll bring mouse over them.

How to Add Facebook Share or Like Button in Blogger Templates


Social bookmarking services such as StumbleUpon, Digg & Reddit (->My love) are really popular these days & if a blog post makes it's way to the front page of these services then it's your lucky day. The concept is simple; people browsing web share their favorite bookmarks with others through these services. You can install these icons in your post footer so that your visitors can easily share a post.
Remember: Backup your template before moving on.

Steps to Add the Social Bookmarking Icons.


  1. Go to Layout | Edit HTML.
  2. Check Expand Widget Templates, the page will automatically refresh.
  3. After that press Ctrl + f and search for this code:
    <div class='post-body entry-content'>
       <data:post.body/>
       <div style='clear: both;'/> <!-- clear for photos floats -->
     </div>
  4. Now, place the following code right after the previous step code:
    <b:if cond='data:blog.pageType == &quot;item&quot;'>
    <big><big><big> Share this post! </big></big></big>
    <div class='spacer' style='margin-top:10px;margin-bottom:10px;border-top:solid 1px #DEDEDE;'/>
    <div class='social-table'>
    <table border='0' cellpadding='0' cellspacing='0' width='100%'>
    <tr>
    <td valign='top' width='50%'><table border='0' cellpadding='0' cellspacing='0' width='222'>
    <tr>
    <td height='24' width='24'><img border='0' height='16' src='http://lh3.ggpht.com/_TqPdHmAEwTM/SgxdHoRIprI/AAAAAAAAEC4/UOmW1Zfg04I/facebook.png' width='16'/></td>
    <td height='24'><a expr:href='&quot;http://www.facebook.com/share.php?u=&quot; +data:post.url'><strong>Share on Facebook</strong></a>
    </td>
    </tr>
    <tr>
    <td height='24'><img border='0' src='http://lh4.ggpht.com/_TqPdHmAEwTM/SgxdH2E0JsI/AAAAAAAAEDE/HTXaxE7_KaU/twitter.png'/></td>
    <td height='24'><a expr:href='&quot;http://twitthis.com/twit?url=&quot; + data:post.url + &quot;&amp;title=&quot; + data:post.title'><strong>Share on Twitter</strong></a>
    
    </td>
    </tr>
    <tr>
    <td height='24'><img border='0' height='16' src='http://lh3.ggpht.com/_TqPdHmAEwTM/SgxiZxfvTGI/AAAAAAAAEDU/AvuLyM_PGa4/stumble.png' width='16'/></td>
    <td height='24'><a expr:href='&quot;http://www.stumbleupon.com/submit?url=&quot; +data:post.url'><strong>Share on StumbleUpon</strong></a></td>
    </tr>
    <tr>
    <td height='24'><img border='0' height='16' src='http://lh6.ggpht.com/_TqPdHmAEwTM/Sgxdp40mQUI/AAAAAAAAEDM/_Nee9ul6zpc/s128/delicious.png' width='16'/></td>
    <td height='24'><a expr:href='&quot;http://del.icio.us/post?url&quot; +data:post.url'><strong>Share on Delicious </strong></a></td>
    </tr>
    <tr>
    <td height='24'><img border='0' height='16' src='http://lh4.ggpht.com/_TqPdHmAEwTM/SgxjIHpTaiI/AAAAAAAAEDY/pZtBL9woxzw/reddit.png' width='16'/></td>
    <td height='24'><strong><a expr:href='&quot;http://www.reddit.com/submit?url=&quot; +data:post.url'>Share on Reddit</a></strong>
    </td>
    
    </tr>
    </table></td>
    <td valign='top' width='50%'><table border='0' cellpadding='0' cellspacing='0' width='222'>
    <tr>
    <td height='24' width='24'><img border='0' height='16' src='http://lh4.ggpht.com/_TqPdHmAEwTM/SgxkjUlW8eI/AAAAAAAAEDc/iDE9H_-vX9w/digg.png' width='16'/></td>
    <td height='24'><a expr:href='&quot;http://digg.com/submit?phase=2&amp;url=&quot; + data:post.url + &quot;&amp;title=&quot; + data:post.title' target='_blank'><strong>Share on Digg </strong></a></td>
    </tr>
    <tr>
    <td height='24'><img border='0' height='16' src='http://lh5.ggpht.com/_TqPdHmAEwTM/Sgx1uAMIp7I/AAAAAAAAEDk/UvMj9nzDyJI/design_float.png' width='16'/></td>
    <td height='24'><a expr:href='&quot;http://www.designfloat.com/submit.php?url=&quot; +data:post.url'><strong>Share on DesignFloat</strong></a></td>
    </tr>
    <tr>
    <td height='24'><img border='0' height='16' src='http://lh4.ggpht.com/_TqPdHmAEwTM/Sgxdp80sUoI/AAAAAAAAEDQ/3eYyxtWAGpM/s128/technorati.png' width='16'/></td>
    <td height='24'><strong><a expr:href='&quot;http://technorati.com/faves/?add=&quot; +data:post.url'>Share on Technorati</a></strong></td>
    
    </tr>
    <tr>
    <td height='24'><img alt='Feeds RSS' border='0' height='16' src='http://lh5.ggpht.com/_TqPdHmAEwTM/SgxdH0I91sI/AAAAAAAAEDA/cDcvpz3WJug/feed.png' width='16'/></td>
    <td height='24'><a href='http://feeds2.feedburner.com/BloggerFAQs'><strong>Subscribe to Feeds RSS</strong></a>
    </td>
    </tr>
    </table></td>
    </tr>
    </table>
    </div>
    <div class='spacer' style='margin-top:10px;margin-bottom:10px;border-top:solid 1px #DEDEDE;margin-bottom:10px;'/>
    </b:if>
    <div style='clear: both; height:30px;'/>
  5. The only change you need to do in the above code is to replace http://feeds2.feedburner.com/BloggerFAQs with your blog feed URL.
  6. After that, save your template and you can see the icons in post footer but only on posts' pages.

How to Add Adsense Ads Below Header

How to Add Adsense Ads Below Header in Blogger-Blogspot Blogs
Inserting Adsense code in your Blogger-Blogspot header can be really beneficial. When a visitor comes to your site, he or she will definitely look at your header and then it's your turn to cash that first look. Just follow the steps below.

Lets Do Some Coding Work!


1- Go to Design and then Edit HTML tab.

2- Backup your current layout.

3- Don't check Expand Widget Templates.

4- Find the code given below. You can find it just after </head> tag:

<div id="header-wrapper">
<b:section class="header" id="header" maxwidgets="1" showaddelement="no">
<b:widget id="Header1" locked="false" title="Blogger FAQs(Header)" type="Header">
</b:widget>
</b:section></div>

The above code could be a little different but you'll definitely find a similar code in your template. If you're totally confused then feel free to ask for help.

6- In the above code change maxwidgets="1" to maxwidgets="2". Also change showaddelement="no" to showaddelement="yes" and save your template.

7- Now go to the Page Elements tab and there you'll see that you can add another widget in your header.

8- Insert your Adsense code there and make more money.

Wanna Support Beta Templates?


Beta Templates have been helping folks for a while now without asking anything in return. However, if you wanna help us then simply add our link anywhere in your blog. Instructions for adding link can be found at the bottom of this page.

Add Adsense Below Post Titles


Google Adsense is the most popular ad network on the planet. A lot of Blogger users also use it. It's an endless discussion where to place these ads on your blog for maximum exposure. The best ad places are around the header or above the posts or below the post titles. You can easily add adsense in your sidebar as a gadget. But Blogger doesn't allows us to directly place the ads below post titles. The ads below post titles have proven to be one of the most successful money making positions. So, what are you waiting for? Follow this tutorial to add your Adsense ads below post titles.

How to Add Adsense Below Post Titles in Blogspot BlogsPlease Note: I'm assuming that you're using the new Adsense interface.

Steps!

  1. Log in to your Google Adsense account by going to https://www.google.com/adsense/
  2. Go to My ads tab and open Ad units from the left side by expanding Content link.[View Screenshot for Help]
  3. Click new ad unit to create a new ad.[View Screenshot for Help]
  4. Select the size, type and color of your ad. For best results chose either 300x250 medium or 336x250 large rectangle.[View Screenshot for Help]
  5. Give your ad a remember-able name and ad a custom channel to track the ad performance. If you don't know anything about channels then leave that option.
  6. After filling required information, click save and get code button at the bottom of the page.[View Screenshot for Help]
  7. A pop-up window will appear with the ad code. Copy that code.[View Screenshot for Help]
  8. Before pasting the ad code in Blogger, we must make it compatible with Blogger format. So go to http://www.hacktrix.com/adsense-code-converter/ paste the ad code and convert it. You'll find the converted ad code in the bottom box there. Copy the converted ad code.
  9. Open your Blogger account and go to Design then Edit HTML tab and check Expand Widget Templates option.
  10. Press Ctrl + f & find <data:post.body/> you'll see some code like this:
    <div class='post-body entry-content'>
<data:post.body/>
<div style='clear: both;'/> <!-- clear for photos floats -->
</div>
  1. Paste the converted ad code just before the above code. The result would look something like this:
<script type="text/javascript"><!--
google_ad_client = "ca-pub-xxxxxxxxxxxxxxx";
/* my ads */
google_ad_slot = "xxxxxxxxxx";
google_ad_width = 300;
google_ad_height = 250;
//-->
</script>
<script type="text/javascript"
src="http://pagead2.googlesyndication.com/pagead/show_ads.js">
</script>
<div class='post-body entry-content'>
<data:post.body/>
<div style='clear: both;'/> <!-- clear for photos floats -->
</div>
  1. Click the PREVIEW button to see the result. Thought you might not see ads below post titles instantly because sometimes Adsense ads take some time to display.
  2. After that save your template by clicking the SAVE TEMPLATE button.

Tip: Make Ads Appear Only on Post Pages


Usually, users don't like to see too many ads on a single page. So, we can hide the ads under post titles on main page. These ads will appear only when users will click the post title and go to the post page. To do that follow the steps above but after step 8 you have the converted ad code. Ad some more code in that converted code so that it should look like this:

<b:if cond='data:blog.pageType == &quot;item&quot;'><script type="text/javascript"><!--
google_ad_client = "ca-pub-xxxxxxxxxxxxxxx";
/* my ads */
google_ad_slot = "xxxxxxxxxx";
google_ad_width = 300;
google_ad_height = 250;
//-->
</script>
<script type="text/javascript"
src="http://pagead2.googlesyndication.com/pagead/show_ads.js">
</script></b:if>

What I did here is that I've added an if condition to make the ads appear only on post pages. After that, follow the steps above to complete the tutorial.